PurposeUse the power of a sophisticated Natural Language Process (NLP) and Machine Learning (ML) engine to surface and highlight cases that are likely to escalate before they do. Prioritize these cases proactively and drive better outcomes for your customers. |
SummaryThe workflows are intended to be performed approximately twice a day and should take no more than 20 minutes each. It is recommended to perform the workflow at the beginning of your shift and then again in the middle of your shift though you can do it more as needed. |
Workflow Details (applicable for both)
Frequency | Twice per day | |
Time Commitment | 15 - 20 minutes | |
Audience | Support Managers, Escalation Managers and Support Team Leads | |
Goal | Leverage signals generated by SupportLogic's NLP and ML engine to identify the critical escalations before they happen. | |
Focus Area | Console and Escalations pages |
Key Product Areas
The prescribed workflow is performed on the Console and Escalations pages of the SupportLogic UI
Prerequisites
Support Managers should have previously configured global filters in the SupportLogic UI so that they only see the cases that are relevant to them.
Steps to Complete the Console Workflow
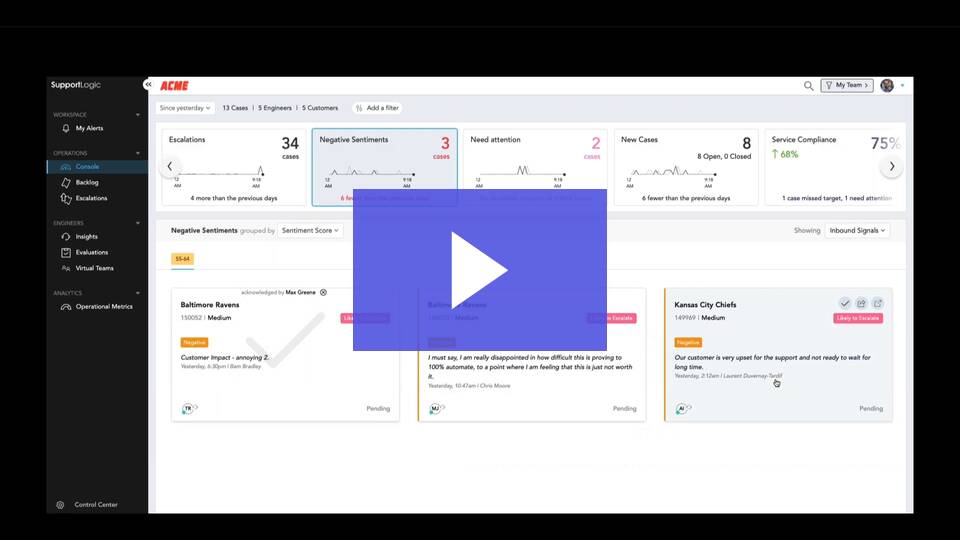
The Console Workflow
The console is a command and control center that surfaces cases to you in real-time based on NLP and ML.
Navigate to the console by selecting it from the navigation bar on the left.
Select your relevant global filter so that you see only the cases that are important to you and/or fall under your purview.
Set your date range appropriately based on your needs
Last 7 days - do this at the start of your week so you see any cases that surfaced during the weekend or that were not addressed the prior week.
Since Yesterday - do this at the start of your day to see any relevant cases that came in since the end of your prior workday.
Today - do this throughout your day to see anything new that has surfaced during your shift.
You can start your workflow on the tiles in any order
Select the Negative Sentiment Tiles on the top navigation bar
The cases shown will be those with negative sentiments detected during the selected time frame
Group the sentiments by any number of options. We recommend using one of these groups:
Signal Type
Elapsed Time
Sentiment Score
Look at the first case in the list
Note the type of signal detected on the case tile and the comment associated with it as well as the assigned engineer
Click on the case tile to open the detailed Support Hub view
Examine the case and read through it if needed
You can click the signal on the sound bites bar to automatically scroll to that location in the case
You have the following options
Add an internal case note to communicate directly on the case with all relevant internal stakeholders
Highlight text in any comment and select annotate, then @mention a user to send a personalized message to the case owner or an SME to get them swarming on the case. This sends a notification to slack with a link to the case. Allowing the @mentioned individual to open the case directly in the UI even if they are unlicensed.
Share the case directly with the case owner or an SME via the share option in the top right of the view and include a personalized note. Same notification type as in the annotation function.
Click the Open Case in CRM link in the top right corner of the case view to open it up in your CRM and perform any additional needed workflows there.
Make sure to hover your mouse over the signals and select the Acknowledge option. This lets SupportLogic as well as other users know that you have taken some action on this case and avoids duplicative work being performed.
If you have the plug-in installed, you also have the option to reassign the case or update the values in any custom fields that are visible in the SupportLogic UI.
Repeat step 5 for all cases with Negative Sentiment detected.
Follow the same process for all cases that are surfaced under the Needs Attention Tile.
Congratulations! You have completed your first Console Workflow.
Steps to Complete the Escalations Workflow
The Escalation Workflow
Escalation workflows are intended to streamline quickly reviewing cases that might be at risk for escalation as well as cases where the customer has made an explicit request to escalate their case. Escalation workflows may be performed in 2 distinct sections of the SupportLogic UI but I would recommend using the Escalations page rather than the console.
Navigate to the Escalations page by selecting it from the navigation bar on the left.
Select your relevant global filter so that you see only the cases that are important to you and/or fall under your purview.
The Escalations page will show all cases that are currently open regardless of age.
The first column lists cases that are not currently escalated but contain risk factors that correlate well with escalations of your cases historically.
These cases are stack ranked by the cases that have the most risk factors and are therefore considered most likely to escalate.
The case tile displays a variety of information including
Case Number
Priority
Risk factors
Sentiment and Attention Scores
Case age
Case Owner
Timestamp of last comment and whether it was inbound or outbound
You have a variety of options that you can take at this point:
 | I took care of it |
 | Snooze it |
 | I disagree with the prediction |
The first 3 options will move the cases out of the 1st queue and into hidden queues that you can revisit any time by selecting them from the icons in the bottom left of the page.
You can also open the case to examine in further detail you can perform the following actions:
Add an internal case note to communicate directly on the case with all relevant internal stakeholders
Highlight text in any comment and select annotate, then @mention a user to send a personalized message to the case owner or an SME to get them swarming on the case. This sends a notification to slack with a link to the case. Allowing the @mentioned individual to open the case directly in the UI even if they are unlicensed.
Share the case directly with the case owner or an SME via the share option in the top right of the view and include a personalized note. Same notification type as in the annotation function.
Click the Open Case in CRM link in the top right corner of the case view to open it up in your CRM and perform any additional needed workflows there.
Make sure to acknowledge, snooze, or disagree with the case regardless of which of the above actions that you perform
- After clearing the Likely to Escalate queue, move on to the second queue which contains Escalation Requests.
- Click the case tile to open the detailed SupportHub case view
- Examine the case and perform any of the workflow actions that we recommended above.
- Exit the case and if you do not intend to escalate it, click the X on the case tile to decline the request removing it from the queue. It can be referenced again if needed from the hidden queue in the bottom left of the page.
Congratulations! You have completed the Escalations Workflow.
Conclusions
As you become familiar with these workflows, you will be able to complete them quickly and efficiently. Performing them minimum twice a day provides you with the ability to prioritize cases that may be at risk. Leverage SupportLogic to be proactive as opposed to reactive. This allows you to drive improved outcomes for your customers.
Support Manager Workflow Video
Support Manager Workflow - Customer Education Channel
Was this article helpful?
That’s Great!
Thank you for your feedback
Sorry! We couldn't be helpful
Thank you for your feedback
Feedback sent
We appreciate your effort and will try to fix the article