Overview
SLA Compliance puts everything about your Service Level Agreements (SLAs) in one place in SupportLogic. With it, you can:
- Monitor First Response, Follow-up Response and Resolution performance on a dedicated SLAs page.
- Define SLA tiers so strategic customers, regions or segments get their own targets, while everyone else follows a default.
- Set business hours and holidays for each tier, so SLA clocks run only while your team is working.
- Send an automated message to the customer when the First Response SLA is about to expire.
- Create alerts for each SLA type and each SLA tier.
- Filter by SLA status and spot it across SupportLogic, including Account Hub and case cards.
Key concepts
Term | What it means |
|---|---|
SLA type | The activity being measured: First Response Time, Follow-up Response Time or Case Resolution Time. |
SLA tier | A set of SLA targets, business hours and holidays that applies to a group of accounts you choose. |
Default SLA | The tier that applies to every account not assigned to a specific tier. |
Settings | The tab on the SLAs page where you create tiers and set the targets your SLAs are measured against. |
SLA Risk Threshold | The share of the target, as a percentage, at which a case counts as at risk. |
Each account can belong to only one tier, which prevents conflicting targets.
Configure your SLAs
Step 1: Create an SLA tier
- In the left navigation, open SLAs and select the Settings tab.
- Click Add New SLA.
- Under Applicable Accounts, search for and add the Accounts, Virtual Accounts or Virtual Groups the tier applies to. Use the All types menu to narrow the search.
- Set the targets for the tier: First Response Time, Follow-up Response Time and Case Resolution Time.
If you need them, set business hours and holidays (Step 2).
SLAs > Settings tab showing the Default SLA tier and the Add New SLA button
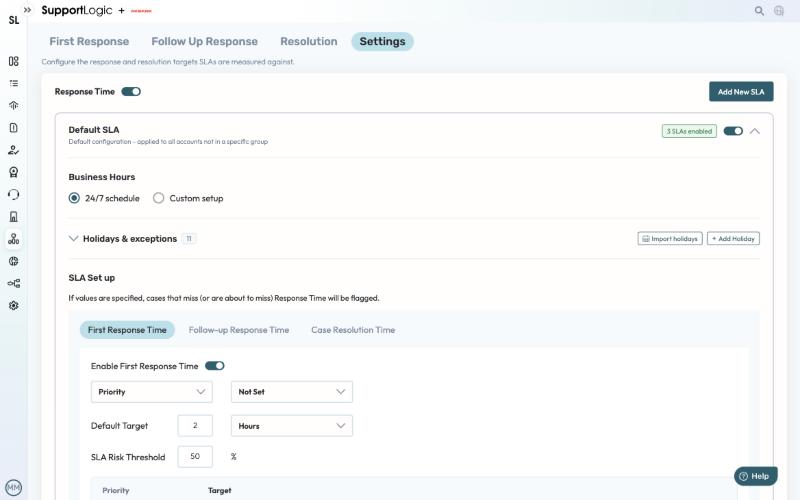
The Settings tab, with the Default SLA tier and the Add New SLA button.

The Default SLA applies to all accounts. Each additional tier lists how many accounts it covers.
Example: Keep the Default SLA for most customers, with a First Response target of 8 hours. Create a Premium tier for your top 20 accounts with a First Response target of 1 hour.
Tip: Under What counts as a response, you can exclude bot replies and choose whether internal notes count as a response. These settings apply to both First Response Time and Follow-up Response Time.
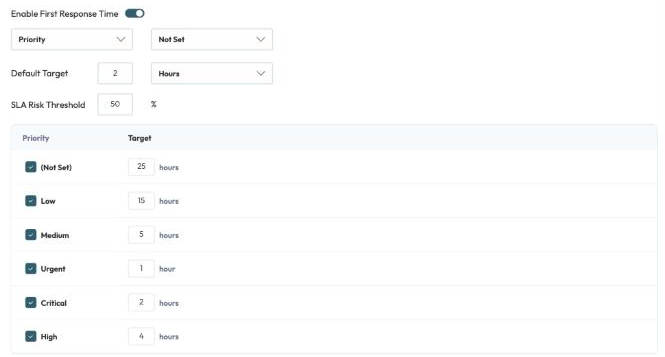
First Response Time targets set by Priority, with a Default Target and an SLA Risk Threshold.
Step 2: Set business hours and holidays
Each tier has an optional Business Hours section and a Holidays & exceptions section. Once set, they apply to every SLA type in that tier.
Important: SLA clocks pause outside business hours and on holidays. They resume automatically when business hours start again.
Business hours
- 24/7 schedule: choose this if your team supports customers around the clock.
- Custom setup:set working hours for each day of the week.
- Add more than one time interval in a day, for example to leave a break in the middle.
- Switch a day off to mark it Closed.
- Select a time zone. This is required, and your hours apply in that time zone.
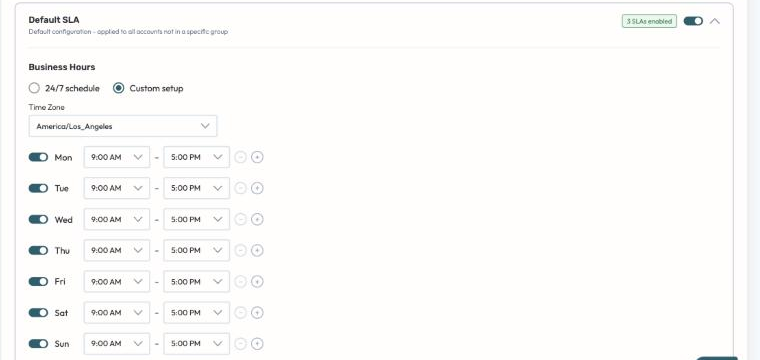 Custom setup: choose a time zone and set the hours for each day.
Holidays and exceptions
- Add a one-time holiday on a specific date, or a recurring holiday that repeats every year.
- Override the hours for a specific day, for example a half day.
- Click Import holidays to add public holidays for the US, UK, India or Australia.
- To remove a holiday, click the trash icon next to it.
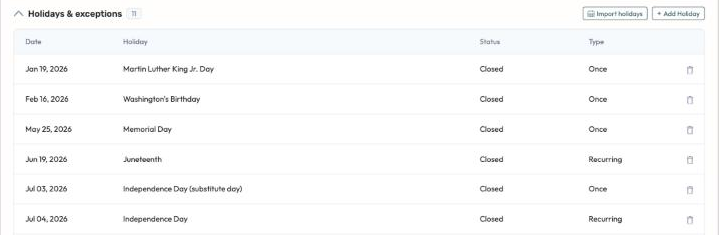
Holidays & exceptions, with the Import holidays and + Add Holiday buttons.
Date | Name | Hours | Type |
|---|---|---|---|
Dec 25 | Christmas | Closed | Recurring |
Nov 27, 2026 | Black Friday | 09:00–13:00 | One-time |
Step 3: Set Follow-up Response targets
Follow-up Response Time has its own field selections, separate from First Response Time.
- Choose the case fields that define your targets, for example Severity and Status.
- Set a Default Target, for example 72 hours.
- Set an SLA Risk Threshold, for example 75%. A case is treated as at risk once 75% of its target time has passed.
In the grid, adjust the target for each combination of field values. For example, give Urgent cases a shorter target than Low cases.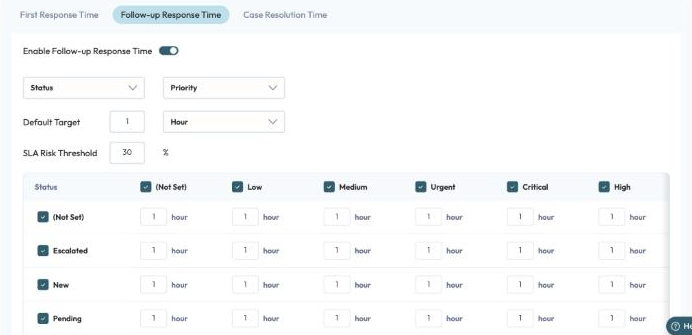
Follow-up Response Time targets set for each combination of Status and Priority.
Step 4 (optional): Turn on Automated SLA Response
Automated SLA Response tells customers their case is being handled before the First Response SLA runs out.
- In the First Response SLA settings, turn on Automated SLA Response.
- The message is sent when the First Response SLA Risk Threshold is reached, for example once 50% of the SLA time has passed.
- Choose a message type:
- Custom message: write your own template. You can use the variables
[Case ID],[Reporter Name],[Case Subject]and[Company]. - Hyper-personalized message (GenAI): the AI agent writes each message. It uses the case details, the customer's history and the tone you choose, for example empathetic, professional or urgent. Click Test Sample Message to preview a message for a case you pick.
- Custom message: write your own template. You can use the variables
- For GenAI messages, choose a Delivery Mode:
- Send directly to customer.
- Send as a draft to the case owner for review. The draft is added as a case note, and the case owner gets an email to review and send it.
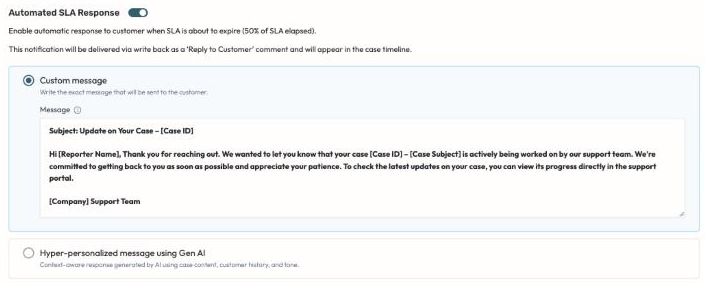
Option A: a custom message template with variables.
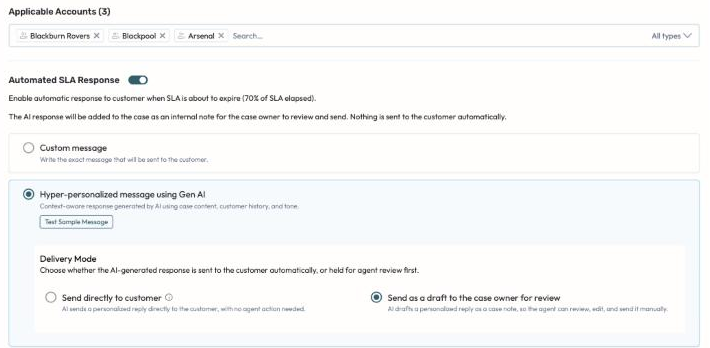
Option B: a GenAI message, with Test Sample Message and Delivery Mode.
The message is posted as a Reply to Customer comment and appears in the case timeline. Messages written by GenAI are labeled as AI-generated for the customer.
Get alerted on SLAs
You can create an alert for any SLA type and any SLA tier, including the Default SLA and every tier you create.
- Open Alerts and click Create alert.
- Select Standard Alert, then click Create alert. The alert is saved as a draft as you work, and it won't notify anyone until it has conditions.
- In the Alert Conditions list on the right, expand SLA. Then expand the SLA type and tier you want, for example Default SLA First Response Time.
- Was just missed: the SLA deadline has just passed.
- Will be missed soon: only the percentage of SLA time you set is left, for example 20%.
- Under Notification Method, choose how to be notified, by email, Slack or both. You can also notify other recipients or the case owner.
- The alert goes live automatically once nothing is missing. There's no separate publish step.
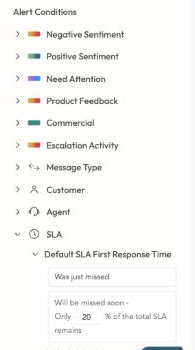
Alert Conditions > SLA > Default SLA First Response Time, showing the Was just missed and Will be missed soon options.
Example: An alert named First response compliance alert with the condition First Response Time SLA will be missed soon – Default SLA – Only 15% of the total SLA remains.
Good to know
- If an alert includes a time-based condition, all of its conditions must be met (AND logic) before it fires.
- Percentages must be whole numbers, for example 80% and not 80.5%.
Monitor SLA compliance
The SLAs page
Open SLAs in the left navigation. There is a tab for each SLA type:
- First Response: how quickly cases get their first reply.
- Follow Up Response: how quickly your team replies after the customer responds.
- Resolution: how long cases take to resolve.
On each tab you can:
- Pick a date range and filter by engineer, customer or other case fields.
- See the share of cases that met the target, for example 55% met target. The average time and the target appear below the chart.
- Break results down by case field, such as type, to find patterns across accounts and teams.
- Click Add Chart to add more views.
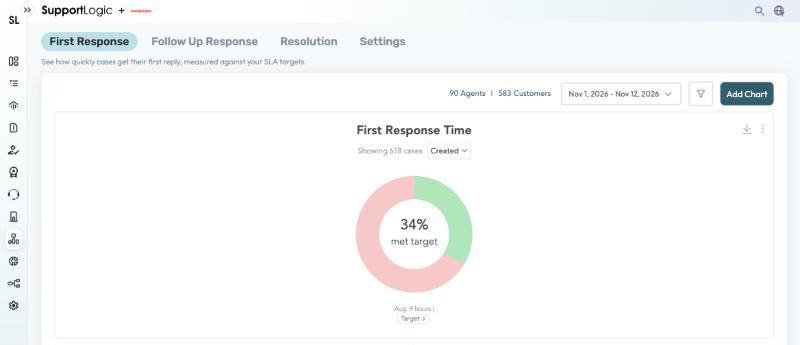
The First Response tab, showing the share of cases that met the target.
SLA filters
SLA tier and SLA type are available as global and dynamic filters across SupportLogic. Select one or more tiers, or choose Select all, then click Apply.
Account Hub
Each account shows its SLA tier under Account Info. To go to that tier's settings, click the link icon next to the tier name.
Case cards
Case cards show SLA status along with the tier name, for example Default First Response Time missed!. This lets you see at a glance which cases missed which SLA, and under which tier.
Quick reference
Capability | Where to find it | What it does |
|---|---|---|
SLA metrics | SLAs > First Response, Follow Up Response, Resolution | Track performance against your targets |
SLA tiers | SLAs > Settings > Add New SLA | Set different targets for different accounts |
Business hours and holidays | SLAs > Settings, inside each tier | Pause SLA clocks outside working time |
Automated SLA Response | First Response SLA settings | Message the customer before the SLA runs out |
Alerts | Alerts > SLA conditions | Notify you about missed SLAs or SLAs about to be missed |
Filters | Filters across pages | Filter by SLA tier and type |
FAQ
Can an account be in more than one SLA tier? No. An account can belong to only one tier, so its targets are always clear.
What happens to accounts I don't assign to a tier? They follow the Default SLA.
How many tiers can I create? There is no limit.
Do business hours apply to all SLA types? Yes. A tier's business hours and holidays apply to First Response, Follow-up Response and Resolution for that tier.
Will customers know a message was written by AI? Yes. Automated messages written with GenAI are labeled as AI-generated.
Was this article helpful?
That’s Great!
Thank you for your feedback
Sorry! We couldn't be helpful
Thank you for your feedback
Feedback sent
We appreciate your effort and will try to fix the article